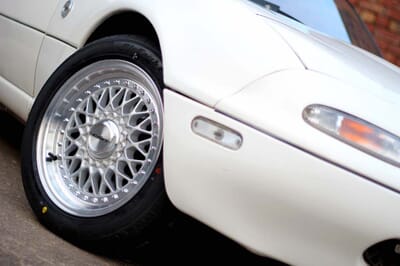
In our first 'Great Mk1 Giveaway' modification, you chose the Calibre Vintage Alloy Wheels for our project car – here’s how we went about fitting them
We’re upgrading a Mk1/NA MX5 with a selection of mods chosen by you from the MX5 Parts shop, the first of which were new wheels. Of the three options you picked the rather stylish looking 15-inch Calibre Vintage Alloy Wheel in a classic cross-spoke design, similar to the classic BBS wheels fitted to Japanese market limited editions like the legendary RS Limited. So, how did we go about fitting them?
MX5 Parts offers full wheel and tyre packages to make swapping your rims as easy as possible. You can, if you’d prefer, buy many of the wheels on their own and arrange to have your tyres changed over if you’re sticking with the same size, but this obviously requires leaving the car on axle stands (or another set of wheels if you have them) while you try and find a friendly tyre fitter willing to do the job. Experience shows this isn’t always as easy as you might hope and, whether you’re keeping as spares or intending to sell them on, it’s usually far easier to do wheels and tyres in one hit.
In theory, you can do the swap yourself with the jack and wheelbrace that should be clipped inside the boot of your Mk1, though you’ll have to do a corner at a time and it can take a bit longer. With a few basic tools you can speed the process up and we used a trolley style jack to do two wheels at a time, swapping the fronts by jacking under the front crossmember and the rears by lifting the car on the differential casing. In both instances you want to make sure the wheels that remain on the ground are correctly chocked and it’s a sensible precaution to pop some axle stands under the jacking points on the sills and lower the car onto them while you swap the wheels over.
A proper wheelbrace or even a cordless driver make loosening and removing the wheelnuts a lot faster as well, our cheapo 12V impact wrench simply plugging into the cigarette lighter for the full pit crew effect.
However you choose to do it swapping a wheel is a pretty simple job, assuming you know where the key for any locking wheelnuts is! Bolts off you simply lift the old one off, replace it with the new one and do the nuts up, convention dictating you tighten opposing bolts rather than going in sequence. If you’ve got one a torque wrench is the proper way to do it but that’s an expensive piece of kit many DIY mechanics may not have knocking about. While you’ve got the wheel off it’s not a bad idea to check the condition of your brake discs and pads to make sure they’ve got plenty of life left in them and – if not – order some new ones to fit from the MX5 Parts.
With all four wheels changed and the car back on the ground it’s time to go round and once again the wheelnuts are all tight, whether by feel or that torque wrench as appropriate. At the same time it probably makes sense to check the pressure on each of the tyres as you go to make sure they’re all spot on before going for a drive. For the Calibre Vintage Alloy Wheels we fitted the only additional job was to attach the stickers to the centre caps, which then screw into the bolt recess with the supplied plastic spanner, taking care to align the ‘spokes’ so it all looks neat and tidy. Before doing that you might want to go for a quick drive and check the bolts are all tight on your return just for total peace of mind.
And you’re done!


Leave your comment